项目实战:使用QCustomPlot实现多窗口绘制数据(支持GPU加速)
本文介绍了基于Qt6和QCustomPlot实现多窗口数据绘制的项目。项目采用主线程负责UI刷新、子线程负责数据生成的架构,支持高达5000万个数据点的高效绘制。关键技术包括:1)使用Freeglut实现GPU加速;2)通过信号槽机制实现线程间通信;3)采用滑动窗口机制优化大数据量显示。项目解决了OpenGL加速导致的颜色异常和像素显示问题,提供了完整的开源代码(Gitee/Github)。
前言
本篇博客主要是使用QCustomPlot在Qt6中实现多窗口绘制数据,其中GPU加速使用的是Freeglut,项目环境为Windows x64。
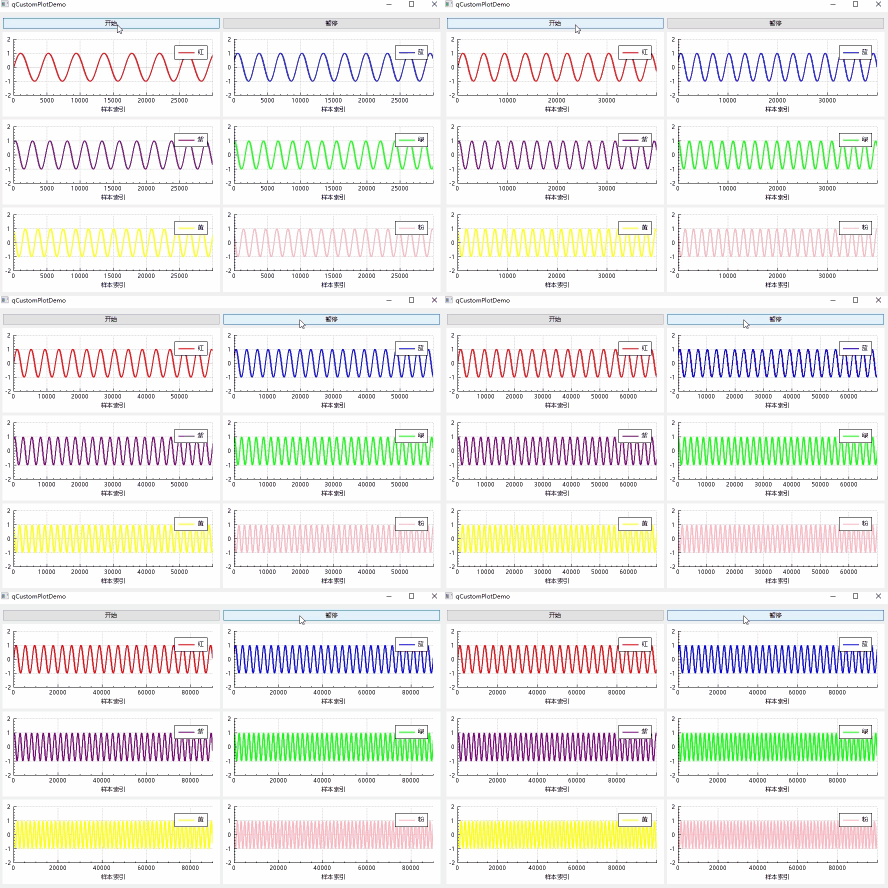
项目效果
图1.项目效果
PS:由于CSDN的原因导致图片不能传输大于5MB,部分的细节没有展示
项目实现思路
主窗口qCustomPlotDemo持有六个QCustomPlot控件,数据生成在子线程DataWorker中完成,生成后的数据通过信号槽接收数据并更新曲线与坐标轴,实现主线程只负责 UI 刷新,子线程只负责数据的生成的功能。并且经过测试,当前项目支持高达5千万个点刷新不卡顿,五千万个点同时显示并且没有进行替换,项目链接中的代码已经增加类似于滑动窗口的机制,将旧数据进行了替换,读者有需要的可以自行修改代码。以下是项目构建中使用到的模块:
1.Qt Core:提供非GUI的基础服务,是所有Qt应用的基石
2.Qt GUI:提供图形用户界面所需的底层抽象,如窗口、事件、基本绘图
3.Qt OpenGL Widget:专门用于在Qt控件架构中嵌入和渲染OpenGL内容
4.Qt Print Support:提供跨平台的打印功能支持
5.Qt Widgets:提供基于控件的传统用户界面组件
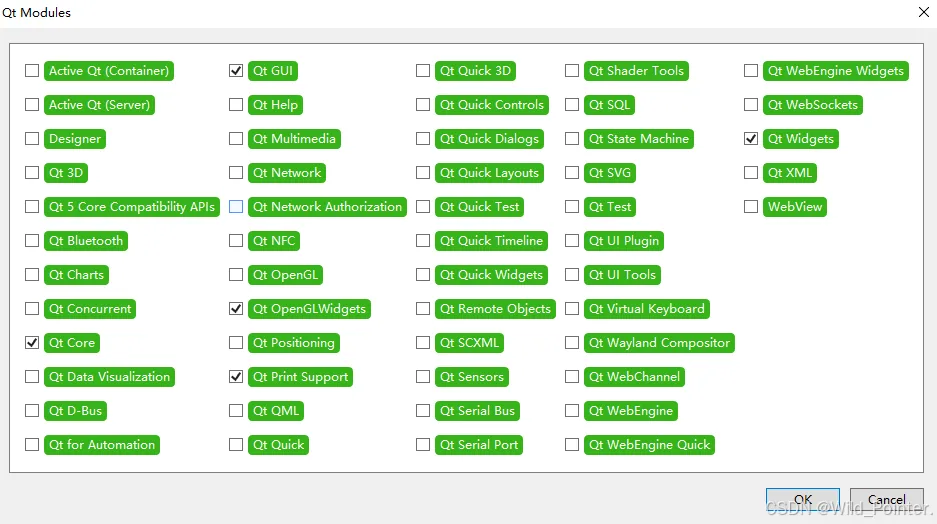
图2.导入的模块
由于项目中使用到了Freeglut,还没有配置的读者可以参考下面这篇位置,使用CMake和Visual Studio进行编译。具体链接如下
环境配置:编译并使用Freeglut工具库https://blog.csdn.net/weixin_67035108/article/details/155578244?sharetype=blogdetail&sharerId=155578244&sharerefer=PC&sharesource=weixin_67035108&spm=1011.2480.3001.8118
项目关键代码
/* 初始化信号槽*/void qCustomPlotDemo::init_Connect() { //信号:开始按钮被点击 槽:开始生成数据 connect(m_startBtn, &QPushButton::clicked, this, &qCustomPlotDemo::handle_startGeneration); //信号:暂停按钮被点击 槽:暂停生成数据 connect(m_pauseBtn, &QPushButton::clicked, this, &qCustomPlotDemo::handle_pauseGeneration); //信号:数据就绪 connect(m_worker, &DataWorker::handle_sendDataReady, this, &qCustomPlotDemo::handle_showData, Qt::QueuedConnection); // 事件循环起始时再次启用OpenGL与设备像素比,确保上下文有效 QTimer::singleShot(0, this, [this]() { for (auto* p : m_plots) { p->setOpenGl(true, 8); p->replot(QCustomPlot::rpImmediateRefresh); } });}/* 初始化数据生成模块*/void qCustomPlotDemo::init_workerModule(){ m_workerThread = new QThread(this); m_worker = new DataWorker(m_graphs.size()); m_worker->moveToThread(m_workerThread); qRegisterMetaType<QVector<double>>("QVector<double>"); m_workerThread->start();}/* 开始生成数据*/void qCustomPlotDemo::handle_startGeneration(){ if (!m_running){ m_running = true; QMetaObject::invokeMethod(m_worker, "handle_Start", Qt::QueuedConnection); }}/* 暂停生成数据*/void qCustomPlotDemo::handle_pauseGeneration(){ m_running = false; QMetaObject::invokeMethod(m_worker, "handle_Stop", Qt::QueuedConnection);}/* 显示数据* idx:X轴索引 keys: values: lastKey:*/void qCustomPlotDemo::handle_showData(int idx, const QVector<double>& keys, const QVector<double>& values, int lastKey){ m_key = lastKey; if (m_key <= m_capPoints) { m_graphs[idx]->addData(keys, values); } else { m_graphs[idx]->data()->removeBefore(m_key - m_capPoints + 1); m_graphs[idx]->addData(keys, values); } double startKey = m_key > m_capPoints ? (m_key - m_capPoints + 1) : 0; m_plots[idx]->xAxis->setRange(startKey, m_key); m_plots[idx]->replot(QCustomPlot::rpQueuedReplot);}项目难点
1.使用GPU加速后显示的折线图颜色异常,这时候需要我们修改QCustomPlot中的QCPPaintBuffrtGlFbo::draw代码,具体如图:
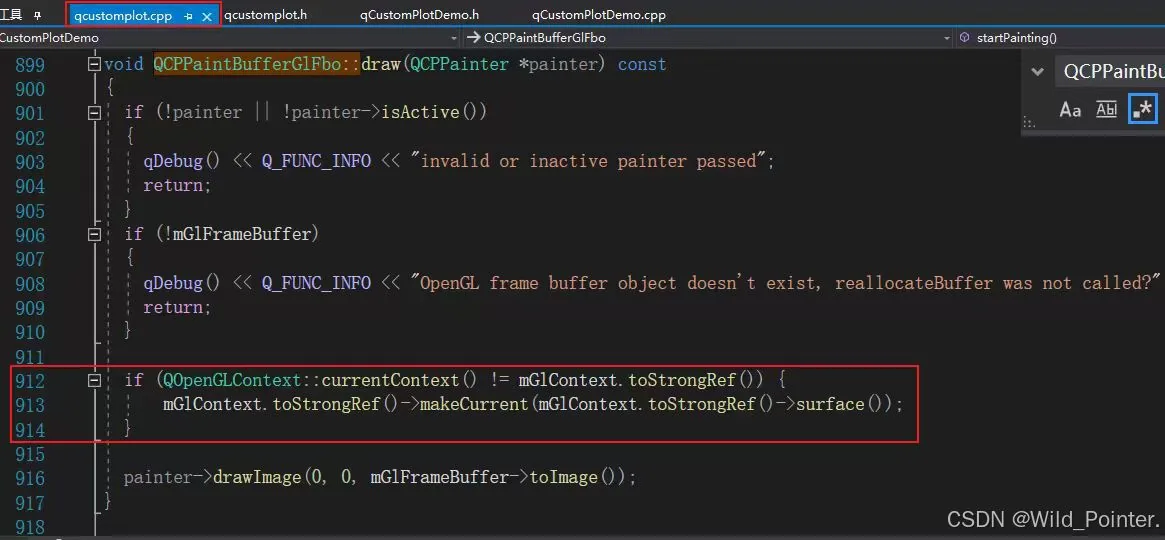
图3.修改QCustomPlot代码
具体的代码如下,可以直接复制粘贴:
if (QOpenGLContext::currentContext() != mGlContext.toStrongRef()) { mGlContext.toStrongRef()->makeCurrent(mGlContext.toStrongRef()->surface());}2.使用OpenGL导致像素异常,这个时候我们只需要在项目中添加上下面这段代码即可,不需要修改源码:
// 事件循环起始时再次启用OpenGL与设备像素比,确保上下文有效QTimer::singleShot(0, this, [this]() { for (auto* p : m_plots) { p->setOpenGl(true, 8); p->replot(QCustomPlot::rpImmediateRefresh); }});项目开源链接
1.Gitee开源链接:
QCustomPlotDemo: 使用QCustomPlot实现多窗口绘制数据(支持GPU加速)https://gitee.com/Mr-Xuiiii/qcustom-plot-demo2.Github开源链接:
https://github.com/3020Xmy/qCustomPlotDemohttps://github.com/3020Xmy/qCustomPlotDemo