源码剖析:STL中序列式容器之vector
本文主要讲解STL中的容器实现,重点对比序列式容器和关联式容器的区别,并详细分析vector容器的实现。序列式容器按元素添加顺序组织数据,支持快速随机访问;关联式容器通过键值对存储,使用平衡树或哈希表组织,查找效率更高。文章深入剖析vector的数据结构、构造函数、析构函数实现,以及常用操作如push_back、pop_back、insert、erase等的源码实现。vector采用线性连续空间结构,使用三个迭代器(start、finish、end_of_storage)分别标记已使用空间头尾和总空间尾,能
前言
本系列将重点对STL中的容器进行讲解,而在容器的分类中,我们将容器分为序列式容器和关联式容器。本章作为容器的实现源码的讲解,将简单介绍这两种类型的容器的区别,再对每一个类型所含的容器的实现源码进行讲解。
序列式容器和关联式容器
序列式容器:按照元素的添加顺序来组织元素。提供了一种线性的数据结构,可以快速何位置的元素,插入和删除操作可能需要移动其他元素
关联式容器:通过键值对来存储元素,并且通常使用某种形式的平衡树或哈希表来组织元素。特别是对于大量数据,关联式容器在查找、插入和删除操作上通常具有较高的效率
序列式容器和关联式容器的区别:
| 序列式容器 | 关联式容器 | |
| 存储方式 | 元素添加顺序存储 | 按键的顺序或哈希值存储 |
| 访问速度 | 支持快速随机访问 | 不支持快速随机访问 |
| 插入和删除 | 在插入和删除时要移动元素,可能较慢 | 能提供快速的插入和删除操作 |
| 元素唯一性 | 不保证元素的唯一性 | 保证元素的唯一性 |
| 迭代器类型 | 随机访问迭代器 | 双向迭代器或正向迭代器 |
表1.序列式容器和关联式容器的区别
vector的定义和结构
vector属于序列式容器,定义在头文件<vector>中,但是SGI STL将其实现放在更底层的<stl_vector.h>头文件中。vector和数组很像,但是vector属于动态存储空间,能自动随着元素的插入而自行扩充空间以容纳新的元素,数组只能通过new或者malloc重新分配更大的空间,并将元素移动到新的空间。
在阅读过《STL源码刨析:迭代器概念与Traits编程方法》后,我们应该清楚以下几点:
1.每一个容器和具体的实现算法是分开定义的,而为了将容器和算法串联在一起,我们要为其定义迭代器(PS:vector的迭代器类型为随机迭代器,因为使用vector容器时支持下标操作)
2.针对迭代器的类型,我们还需要对其封装并判断传入模板的类型(Traits编程方法)
3.每一个容器都需要为其分配内存空间,所以我们还需要一个空间配置器
在以上三点的基础上,我们还需要对容器定义三个迭代器,分别指向使用空间的头,使用空间的尾和空闲空间的尾。所以我们的vector容器的结构应该大体如下:
//vector容器的大体结构template<class T, class Alloc = alloc> //alloc是默认的配置器class vector{public: typedef T value_type; //传入的参数的类型 typedef value_type* pointer; //传入的参数的指针 typedef value_type* iterator; //传入的参数的迭代器 typedef value_type& reference; //传入的参数的引用 typedef size_t size_type; //传入的大小 typedef ptrdiff_t difference_type; //传入的元素之间的距离protector: typedef simple_alloc<value_type, Alloc> data_allocator; //配置器的定义 iterator start; //表示可用空间的头 iterator finish; //表示可用空间的尾 iterator end_od_storage;//表示空闲空间的尾}//simple_alloc配置器的实现template<class T, class Alloc = alloc>class simple_alloc{public: //分配空间 static T* allocate(size_t n){ return 0 == n ? (T*)Alloc:: allocate(n * sizeof(n)); } static T* allocate(void){ return (T*)Alloc :: allocate(sizeof(T)); } //释放空间 statice T* deallocate(T* p, size_t n){ if(0 != n){ Alloc::deallocate(p,n * sizeof(T));} } statice T* deallocate(T* p){ Alloc::deallocate(p,sizeof(n));}}vector的构造函数和析构函数的实现
vector作为常用的容器类型,无论是在项目中还是在算法题中常常出现,所以我们对其构造函数并不陌生,以下便是的构造函数和析构函数的实现(PS:千万不要在容器中存放指针,指针如果是使用new进行分配的,并不能直接通过调用vector的析构函数对其元素进行释放,必须得遍历整个容器依次释放,否则会存在内存泄漏):
/* 针对代码中的uninitalized_fill_n()和destroy函数 请参见《STL源码刨析:空间配置器(allocator)》中内存基本处理函数 *///vector容器的构造函数vecotr() : start(0), finish(0), end_of_storage(0){} //列表初始化vector(int n, const T& value){ fill_initialize(n,value); }vector(long n,const T& value){ fill_initialize(n,value); }explicit vector(szie_type n){ fill_initialize(n,T()); } //explicit用于禁止隐式转换vector(size_type n, const T& value){ fill_initialize(n,value); }void fill_initialize(size_type n,const T& value){ start = allocate_and_fill(n,value); //使用配置器分配空间 finish = start + n; end_of_storage = finish;}iterator allocate_and_fill(size_type new_size, const T& x){ iterator result = data_allocator::allocate(n); //分配空间 uninitalized_fill_n(result,n,x); return result;}//vector容器的析构函数~vector(){ destroy(start,finish); deallocate();}void deallocate(){ if(start){ data_allocator::deallocate(start, end_of_storage - start); //释放空间 }}vector的数据结构以及实现源码
vector容器的数据结构采用的是线性连续空间,以定义的迭代器start和finish分别指向以及使用的空间的头部和尾部(范围),并以迭代器end_of_storage指向分配的空间的尾部(PS:start和finish指向的是使用的空间,end_of_storage指向的分配的全部空间的尾部),使用这三个迭代器我们将可以使用首尾元素,容器大小,整体容量,空容器的判断,下标运算符[],头元素和尾元素的值的接口函数,整体实现如下:
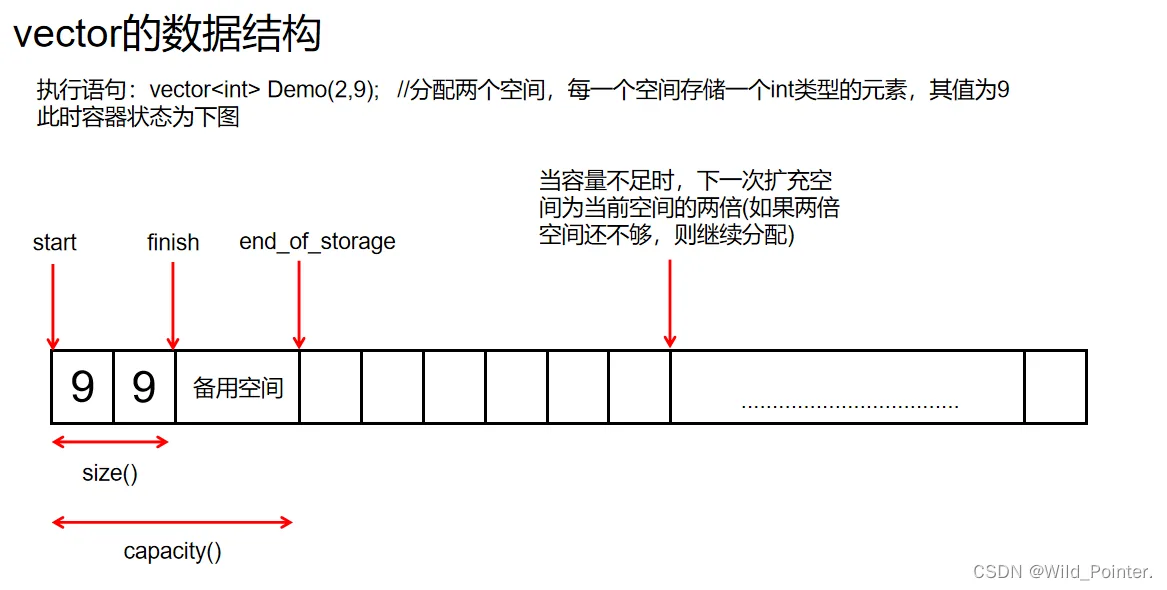
//返回头元素指针iterator begin(){ return start; }//返回尾元素指针iterator end() { return finish; }//返回容器使用的空间大小size_type size() const { return szie_type(end() - begin());}//返回容器的全部空间大小size_type capacity() const { return size_type(end_of_storage - begin());}//返回容器是否为空bool empty() const { return begin() == end(); }//返回指定下标的元素reference operator[](size_type n){ return *(begin() + n); }//返回容器的头元素的值reference front(){ return *begin(); }//返回容器的尾元素的值reference back() {return *(end() - 1); }阅读本段,可能会产生疑问。全部空间是什么?已经使用的空间是什么?为什么back返回的值是尾指针-1后的值?针对这些疑问,获取阅读下图便会清晰:
图1.vector的数据结构
参考上图可知,迭代器finish指向的并不是最后一个元素的地址,而是指向最后一个元素的地址的下一个地址。而且size()函数返回的是已经使用的空间大小,capacity()函数返回的是系统分配的整体空间的大小
vector的元素操作
关于vactor容器的元素操作,我们常用的便是push_back(),pop-back(),clear()和insert(),在此基础上,还要有一个用于清除元素的操作erase(),其中clear()函数也是调用的erase()函数。针对以上的四个函数实现如下。
1.push_back()函数实现源码:
//push_back函数主要用于在容器的尾部插入元素void push_back()(const T& x){ if(finish != end_of_storage){ //存在多余空间 construct(finish,x); //参见《STL源码刨析:空间配置器(allocator)》,配置器初始化 ++finish; } else insert_aux(end(),x);}template <class T, class Alloc>void vector<T,Alloc>::insert_aux(iterator position, const T& x){ if(finish != end_of_storage){ //存在多余空间 construct(finish,*(finish - 1)); ++finish; //调整尾指针 T x_copy = x; copy_bcakward(position,finish - 2,finish - 1); *position = x_copy; } else{ //无多余空间 const size_type old_size = size(); //当前使用空间 const size_type len = ild_size != 0 ? 2 * old_size : 1; //当前空间为0则分配一个内存大小,当前空间不为0则分配2倍的当前空间的大小 iterator new_start = data_allocator::allocate(len); iterator new_finish = new_statr; try{ //尝试将先前的元素拷贝到新申请的空间 new_finish = uninitialized_copy(start,positon,new_start); //将原容器中的元素插入新容器 construct(new_finish,x); ++new_finish; new_finish = uninitialized_copy(position,finish,new_finish); //将新元素插入新容器 } catch(){//捕获异常 destroy(new_start,new_finish); //释放分配的空间 data_allocator::deallocate(new_start,len); throw; } destory(begin(),end()); //释放原来容器的空间 deallocate(); //更新迭代器 start = new_start; finish = new_finish; end_of_storage = new_start + len; }}2.pop_back()函数实现源码:
//pop_back()函数主要用于将容器尾部的元素删除void pop_back(){ --finish; destroy(finish); //使用配置器释放空间}3.erase()函数实现源码:
//erase()函数主要用于清除容器中的指定范围的元素或指定元素iterator erase(iterator first, iterator last){ //清除容器中[first,last)范围中的元素 iterator i = copy(last,finish,first); //将last后的元素复制到first destroy(i,finish); //释放空间 finish = finish - (last - first); return finish;}iterator erase(iterator position){ //清除指定位置的元素 if(position + 1 != end()) copy(position + 1, finish, position); --finish; destory(finish); return position;} 针对erase()函数,可参考下图,直观了解其实现过程:
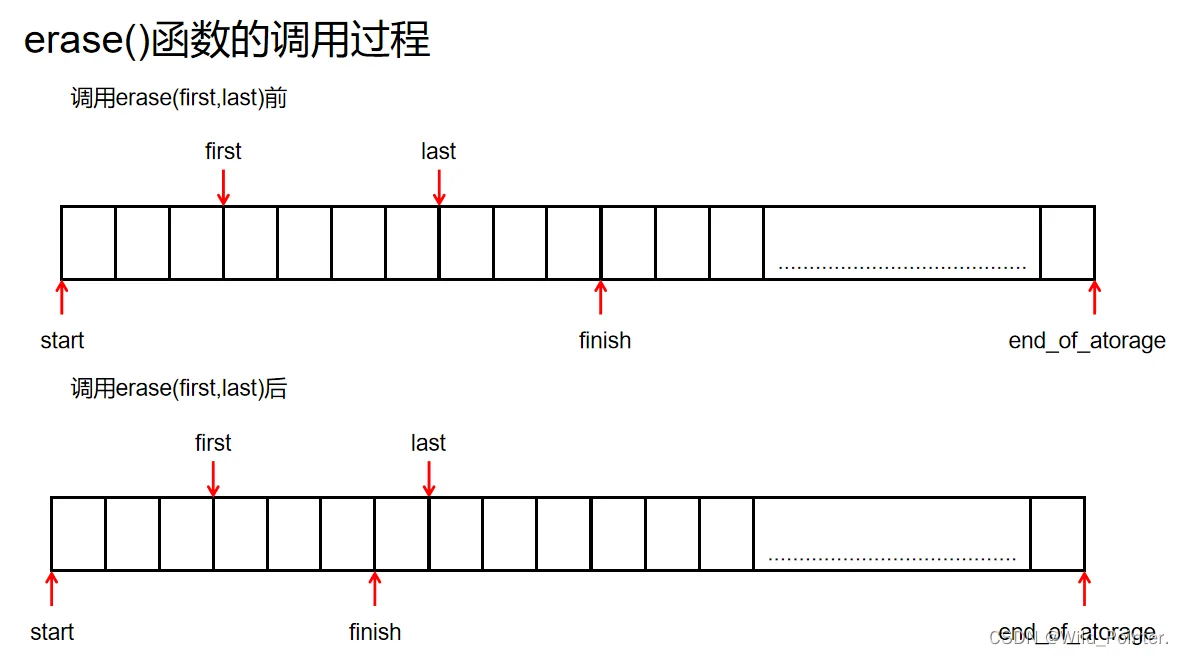
图2.erase()函数的调用过程
4.clear()函数实现源码:
//clear()函数主要用于将容器的元素删除void clear() { erase(begin(),end()); } 5.insert()函数实现源码:
//insert()函数主要用于将容器的元素插入template<class T, class Alloc>void vector<T, Alloc>::insert(iterator position, size_type n, const T& x){ if(n != 0){ //插入的元素个数不为0 if(size_type(end_of_storage - finish) >= n){ //空闲空间大于插入个数 T x_copy = x; const size_type elems_after = finish - position; //获取当前位于插入位置后的元素个数 iterator old_finish = finish; if(elems_after > n){ //插入点后的元素个数大于插入的元素个数 uninitialized_copy(finish - n, finish, finish); //将插入点后的元素后移 finish += n; copy_backward(position, old_finish - n, old_finish); fill(position,position + n,x_copy); //从插入点填充新的元素 } else{ //插入点后的元素个数小于等于插入的元素个数 uninitialized_fill_n(finih, n - elems_after, x_copy); //将多出的插入元素填充到空闲内存中 finish += n; uninitialized_copy(position, old_finish, finish); //将插入点后的元素后移 finish += elems_after; fill(position, old_finish, x_copy); //将插入的元素填充至插入点 } } else{ const size_type old_size = size(); //当前容器大小 const size_type len = old_size + max(old_size,n);//计算新的容器大小 iterator new_start = data_allocator::allocate(len); iterator new_finish = mew_start; _STL_TRY{ //尝试将元素移动至新的空间 new_finish = uninitialized_copy(start,position,new_stars); //将插入点前的当前容器的元素复制到新的空间 new_finish = uninitialized_fill_n(new_finish,n,x); //将插入的元素填充至新的空间 new_finish = uninitialized_copy(position,finish,new_finish); //将插入点后的当前容器的元素复制到新的空间 } #ifdef _STL_USE_EXCEPTIONS catch(...){ //捕获异常 destroy(new_stzrt,new_finish); data_allocator::deallocate(ner_start,len); throw; } #endif /*_STL+USE_EXCEPTIONS*/ //无异常 destroy(start,finish); deallocate(); start = new_start; finish = new_finish; end_of_atorage = new_start + len; } }}以上便是本章的内容,针对insert()函数,个人觉得关键点在于插入的元素的个数,如果插入的元素个数大于当前插入点到尾指针的元素个数,则向把旧元素分配至新的空间内再插入新的元素。如果插入的元素个数小于等于当前插入点到尾指针的元素个数,则先将要插入的多出来的元素填充至尾指针后多余的空间内,再将旧元素复制到新的空间内,最后吧插入的元素再填充进去